Showing posts with label mousseline buttercream. Show all posts

Thursday, January 14, 2010

Farewell Marika!

The highlight of my week for over a year and a half now is teaching a small group of kindergartners at KidsQuest, which is the McLean Bible Church version of Sunday school. About six months ago, I was asked to also help out in the large group production--where a group of about 100 kindergarten and first graders come in assembly style to hear a bible story and sing worship songs. Wow! You wouldn't think it, but they are an intimidating group. Their attention span is about 0.5 seconds and definitely let you know if you aren't interesting enough or are just downright boring.

Thankfully, I had an awesome partner on stage who really bolstered my credibility with these youngsters!Marika and I would feed off each other's energy and it really showed when the kids would get fired up for her stories and the songs we'd lead together. Sadly, she recently had to return to her home country of Moldova. To send her a fond farewell (or rather, "see you soon"), we had a party with board games, and a cake that I made.

How often do you let the frosting dictate the cake? Well, I did. I knew that I would be frosting the cake with mousseline buttercream (what else of course!) And when I do, I'll have egg yolks leftover. Is there a cake recipe that only uses egg yolk? YES! It's called Golden Layer Cake, and I found it in The Joy of Cooking.I filled the cake with peaches and cream.Then I decorated it with peachy flowers that are slightly tinged with red at the edges.

Tuesday, September 22, 2009

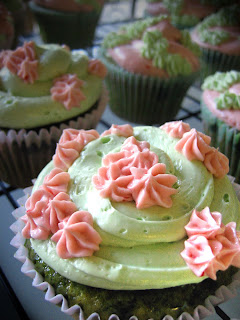
Green Tea CupKates

My friend Uyen recently asked me to make cupcakes for her friend's bridal shower. She specially requested green tea cupcakes with strawberry mousseline buttercream frosting. I'd never made green tea cake before she asked for them. So a couple weeks ago, I whipped up a couple test batches.

The first batch had just a little too much sugar, which made a big difference: the cakes baked too quickly, were too sweet, and did not rise enough. I decreased the sugar, added an egg yolk for smoother texture, and upped the green tea ("macha") powder, and the second test batch was much improved.

The recipe I ended up using for the delivered batch is a twist off the classic white cake.

To amp up the green tea flavor, I poured a green tea glaze over each cupcake. Half of the cupcakes were complemented by strawberry mousseline buttercream, the other half with vanilla mousseline buttercream and a touch of green tea for color.

Recipe follows; however, this recipe is in weight measurements because I had to produce the recipe. (Weight measurements more accurately preserve the ratios necessary to produce successful cakes.)

Green Tea CupKates
(yields approximately 2 dozen cupcakes and maybe a few leftover to experiment/nibble on)
  • 9 ounces cake flour
  • 11 ounces granulated sugar
  • 4 tsps baking powder
  • 1 tsp salt
  • 1 tbsp green tea "macha" powder
  • 12 tbsps (1-1/2 sticks) unsalted butter, room temperature
  • 1 whole egg plus 2 egg whites, room temperature
  • another 3 egg whites, room temperature
  • 1 cup milk, room temperature
  • 1 tsp vanilla extract
  1. Preheat oven to 350 degrees F. Line muffin tins with 24 cupcake liners.

  2. In a large mixing bowl, combine the cake flour, sugar, baking powder and salt. Stir to mix evenly.

  3. Using a pastry blender (see image on the right), cut the butter into the flour mixture one tablespoon at a time. Continue blending until the butter and flour mixture resembles a wet sand texture, with lumps no larger than pea-sized and no dry flour streaks.

  4. Sprinkle the green tea “macha” powder over the mixture.

  5. In a 2-cup measuring cup, combine the milk, 1 whole egg plus 2 egg whites, and vanilla extract. Mix with a fork until just combined.

  6. In a medium bowl, whip the remaining three egg whites to medium peaks.

  7. Pour half the milk mixture into the butter and flour mixture. Stir quickly to combine evenly. Add the remaining milk mixture and stir again to combine evenly.

  8. Add a third of the beaten egg whites to the batter and fold to lightly combine. Add in the rest of the beaten egg whites and lightly fold to combine without deflating the egg white volume.

  9. Fill cupcake liners 2/3 full. Bake approximately 15-18 minutes until a toothpick inserted in the middle of a cupcake comes out dry with just a few crumbs clinging to it and the tops are barely golden.


Green Tea Glaze
(yields more than you'll ever need)


  • ½ cup sifted confectioner's sugar
  • 1 tbsp green tea “macha” powder
  • 3 tbsps milk
Stir the ingredients together with a fork, in a figure-8 motion to avoid bubbles. Pour a teaspoonful over each cooled cupcake.


Strawberry Mousseline Buttercream
(yields about 5 cups, enough to generously frost 24 cupcakes)

  • 5 large egg whites
  • 3/4 cup sugar
  • 1 cup of fresh strawberries, washed and hulled
  • 2 cups unsalted butter, room temperature
  • 1 or 2 tsps vinegar
  • 1 tsp vanilla extract
  1. Place the vinegar on a paper towel and thoroughly wipe out your large mixing bowl. Put the egg whites in the bowl and start beating the egg whites with an electric hand mixer. When they reach soft peaks, gradually add 2 tablespoons of sugar and beat to stiff peaks.

  2. Puree the strawberries in a food processor until fine and almost smooth. Strain the juice twice and set aside. Set aside the strained, crushed strawberries.

  3. In a small heavy saucepan, heat together the rest of the sugar and 1/3 cup of the strawberry juice, stirring, until the sugar dissolves and the mixture is bubbling. Cook until a candy thermometer reaches 248-250 degrees F (the firm ball stage). Immediately remove the syrup from the heat.

  4. If using a handheld mixer, beat the syrup into the whites in a steady stream with the mixer running. Don't pour the syrup on the beaters or they will throw all the syrup on the sides of the bowl. Lower speed to medium and beat until completely cool. Mix in the vanilla extract.

  5. Beat in the butter 1 Tbs at a time. At first the mixture will seem thin and will look curdled, but keep adding butter and mixing well, you may need to increase the speed a bit.

  6. Add 2 tablespoons of the crushed strawberries to the finished buttercream and mix to distribute evenly.

Buttercream becomes spongy on standing, mix again before using. If your buttercream has been chilled, you must allow it to come to room temperature before mixing or it will curdle.


Tuesday, August 25, 2009

How to (with Video): Pipe CupKate Buttercream Roses

After featuring Tracey's cake here on cupkatedang.blogspot.com, people wanted to know how the mousseline buttercream flowers are done. They aren't traditional buttercream roses; they don't have distinct petals. I think that gives them more of a fun, less formal look. Enjoy the video!


Saturday, August 15, 2009

Bon Voyage Tracey!

My friend Tracey had spent the summer in the DC-Metro area doing an intensive orientation before her 9-month secondment to Malaysia for CAMSA. CAMSA stands for the Coalition to Abolish Modern-day Slavery in Asia. Its mission is to rescue and protect trafficking victims, punish traffickers through economic and legal measures, and pressure the governments of the source and destination countries to enact and enforce anti-trafficking laws and policies.

To bid her a fond farewell, her friends threw a barbecue, and I baked her a cake using the dark chocolate cupcake recipe she is such a fan of. To compensate for the longer baking time that would be needed for baking the batter in cake-form rather than cupcakes, I added an extra egg and it really came out well.

The key to the dark richness of the recipe is 2 forms of chocolate: excellent dark chocolate bars, as well as cocoa powder. I used Belgian dark chocolate and a combination of Hershey's Special Dark cocoa and Colombian cocoa powder from a unique source.... It gets slowly melted together with butter over a double boiler:

I often pair my dark chocolate cupcakes with fresh strawberry buttercream, and this time was no exception. It is a variation of the mousseline buttercream recipe that is often mentioned on cupKatedang.blogspot.com. I use fresh strawberries (although frozen can also work well when they go out of season) and puree them in a food processor. I strain the puree through a sieve and use the juice as the liquid base for the sugar syrup that gets incorporated into my italian meringue for the buttercream. When all is said and done, I put a tablespoon or two of the crushed strawberries into the mousseline buttercream to kick up the strawberry flavor and give it an interesting texture. I filled the chocolate cake layers with this strawberry mousseline buttercream and it looked good enough to eat right then and there!

Next came the hard part for me, how to decorate the cake? Earlier this morning, while picking up ingredients for the cake at the local grocery store, I stopped by the bakery section (I can never resist checking out the "competition"!) I saw some cakes decorated with the cutest roses. Not the traditional, Wilton-type, but more...art-deco-y. They were roundish and reminded me of cartoons or clip art. So I knew I wanted to try making those. I whipped up a new batch of vanilla mousseline buttercream, which I dyed a couple different colors to finish trimming the cake.

Italian meringue base for the mousseline buttercream.


A blank canvas!

And now: the finished project....


Best of luck Tracey!

Monday, June 29, 2009

Gluten-Free Chocolate Cupcakes

My friend Amy saw my French Toast and Bacon CupKates the other week and was so bummed she couldn't have one because she is allergic to wheat. Well, this past weekend, we all had a picnic and I decided to try making gluten-free cupcakes.

Very interesting.

I never realized how complicated a gluten-free life can be! Gluten can show up in some of the unexpected of ingredients: soy sauce, tomato soup, beer, pudding.... Read more about it here. It used to be that in order to create gluten-free baked goods, you had to mix half a dozen types of flours in precise proportions and add some kind of gum to simulate the texture that gluten produces. Luckily, now there are brands of "all-purpose" gluten-free flour mixes that take out the guesswork. But the finished product between a cupcake baked with regular flour and one baked with gluten-free flour is often still detectable. But what an adventure!

Turns out that the chocolate cupcakes tasted pretty good. (I think Amy had two and took one to go!) They were moist, but noticeably more crumbly than regular cupcakes. And they didn't rise with little mounds like regular cupcakes do. They did rise but were pretty flat on top.

When following the recipe below, it's important to not fill the cupcake liners too full because they will rise over the cups and will be impossible to remove without destroying them.

Ingredients:

  • 3/4 cup (1-1/2 sticks) butter
  • 2-1/2 cups sugar
  • 3 eggs, plus 1 egg yolk
  • 2 cups gluten-free flour mix (I used the 365 brand from Whole Foods--$3.99/16 oz.)
  • 1 teaspoon baking soda
  • 1/2 teaspoon salt
  • 3/4 cup dark cocoa powder
  • 1 tablespoon instant coffee powder
  • 1-1/2 cups milk
  • 2 teaspoons vanilla
  • 1/4 cup Hershey's syrup

Directions:

  1. Beat butter until softened. Add sugar and beat until light and fluffy.
    Add eggs, one at a time, beating after each addition.
  2. Combine the gluten-free flour, baking soda, salt, cocoa, and coffee powder into a medium bowl.
  3. Measure the milk, vanilla, and chocolate syrup into a small bowl.
  4. Starting with the dry ingredients, alternate adding the dry mixture and milk mixture to the butter/sugar while mixing, finishing with the dry.
  5. Fill cupcake molds about 2/3 full.
  6. Bake at 350 degrees for about 30-35 minutes or until tester comes out clean.
  7. Let them cool completely before frosting them.

I frosted mine with vanilla mousseline buttercream and a royal icing dot.

Saturday, June 20, 2009

Bacon Adventures: Delicious or Disaster?!

Let me say it: Absolutely Delicious!

Throughout the project, which my roommate Meaghan and I collaborated on, I kept convincing myself, "It's gonna be great; it's gonna be fine. Bacon makes everything better!" I have to admit, I had reservations. But as we added ingredient after ingredient, it made less and less sense that the recipe would turn out to be a disaster. Eggs? Flour? Sugar? Cinnamon? Nutmeg? Vanilla? Butter? Bacon fat? Who has any objections to these things? As it turns out, no one should.

The cake was light and moist, with an enveloping aroma of ... Christmas (because of the freshly grated nutmeg and cinnamon)! It was like breakfast french toast, only better. The bits of bacon in the cake were like a tastebud surprise, the saltiness of which contrasted so perfectly with the actual cake.

I'd mentioned in my last post about ambitions to create a mousseline buttercream from maple syrup. It was work. And the whole time, I kept thinking, "This will either be totally awesome or totally disastrous." Totally awesome if the maple syrup can reach a high enough temperature (240 degrees F) without burning. Totally disastrous if it burns into a black mess. It took a long time, but it finally did reach barely 240 degrees. And as always, the mousseline recipe never fails.

French Toast with Bacon CupKates (Yields about 16)

Ingredients:

  • 10 tbsp unsalted butter, at room temperature
  • 3/4 cup sugar
  • 2 tbsp bacon drippings (solidified in refrigerator)
  • 1 ½ cups cake flour, sifted
  • 1 ½ teaspoons baking powder
  • 1/4 teaspoon salt
  • 1 teaspoon fresh grated nutmeg
  • 1 teaspoon cinnamon
  • 1/2 cup milk, at room temperature
  • 2 tbsp maple syrup
  • 1 ½ teaspoon vanilla extract
  • 3 large eggs, at room temperature, separated
  • 1/4 cup of crumbled bacon pieces
Directions:

  1. Place a rack in the middle of the oven and preheat to 375 degrees F. Line the muffin pan with paper cupcake liners. Fry 8 slices of bacon to a crisp, reserve 2 tbsp of the drippings. Crumble the bacon and save for later.
  2. Combine the butter, bacon drippings and sugar and mix on low speed with a mixer until just incorporated. Raise the speed to high and mix until light and fluffy, about 10 minutes. (Occasionally turn the mixer off, and scrape the sides of the bowl down with a rubber spatula.)
  3. Meanwhile, in a medium bowl, sift together the flour, baking powder, salt, nutmeg, and cinnamon. Set aside. In a small bowl, whisk together the milk, maple syrup and vanilla, and also set aside.
  4. Add the egg yolks to the creamed butter one at time, waiting for each one to be fully incorporated before adding the next. Reduce the speed of the mixer to low. Alternately, add the flour mixture in 3 additions and the milk mixture in 2 additions, waiting for each to be fully incorporated before adding the next (scrape the bowl down occasionally). Raise the speed to medium and mix briefly until a smooth batter is formed. Transfer the batter to a large bowl. Sprinkle in the bacon bits and stir to incorporate.
  5. In another clean (oil/grease-free) bowl, whip the egg whites until stiff peaks are formed. Working in 3 batches, using a rubber spatula, fold the egg whites into the batter, until just incorporated. Fill each cupcake liner 3/4 full of batter.
  6. Bake, rotating the pan once, until golden brown and a toothpick inserted in the center of the cakes comes out clean, about 30 minutes.
  7. Remove the cupcakes from the oven and cool completely. Frost with Maple Syrup Mousseline Buttercream. Garnish with a piece of bacon.

Maple Syrup Mousseline Buttercream

Ingredients:

  • 1 cup unsalted butter, softened but cool (about 65 degrees F)
  • 1/4 cup sugar
  • 3/4 cup of maple syrup, Grade A Dark Amber
  • 3 large egg whites
Directions:

  1. Make sure your mixing bowl is very clean and free of grease or oily residue. To be sure, you can wipe your bowl down with a teaspoon of vinegar. Set the bowl aside.
  2. In another mixing bowl, beat the butter until smooth and creamy, set aside in a cool place.
  3. In a small heavy saucepan, heat the maple syrup over low to medium-low heat. Watch out that it does not boil over. Very important.
  4. Start beating the egg whites, when they reach soft peaks, gradually add the sugar and beat to stiff peaks. If using a stand mixer, leave it running on the slowest speed to keep the egg whites from deflating.
  5. Increase the heat under the syrup and cook until a candy thermometer reaches 240 degrees F (the soft ball stage). Be patient. It takes vigilence to make sure that the syrup heats and thickens without boiling over or burning. It may take up to 30 minutes over low heat.
  6. Once 240 degrees is reached, immediately remove the syrup from the heat. If using a handheld mixer, beat the syrup into the whites in a steady stream with the mixer running. Don't pour the syrup on the beaters or they will throw all the syrup on the sides of the bowl. If using a stand mixer, pour 1/4 of the mixture over the whites with the mixer off. Immediately beat at high speed for 5 seconds. Continue with the remaining syrup. Lower speed to medium and beat until completely cool.
  7. Beat in the butter 1 Tbs at a time. At first the mixture will seem thin and will look curdled, but keep adding butter and mixing well, you may need to increase the speed a bit.


I promise you will love it!

Wednesday, June 10, 2009

Happy Birthday Angela!

I decided to go with simple and elegant for Angela's final cake design. The cake is now iced in pistacchio green with ivory swiss dots. I also trimmed it with a grosgrain ribbon that puts some extra color on the cake. I hope she likes it!